 It loads DEMs. Select N49E005.hgt.zip.
Map Designing using WW2Map and MicroDEM
To start things out; first download the following:
1.) WW2Map from Fred's Webpage. (You may also download it from here where I am re-hosting it.) (About 500kb)
2.) MICRODEM from here. (Sadly, it is 40+MB for the complete install)
3.) SPCAMO Color Files for MicroDEM from here. (about 1 kb)
4.) Blank SPCAMO Map from here. (28 kb)
5.) Download and set up Google Earth (highly optional, but very useful in obtaining Lat-Long coordinates.)
6.) Some sort of Graphics editing program, like Paint Shop Pro or Photoshop (Not needed, but HIGHLY useful)
Setting Things Up
1.) Install MICRODEM first. Don't forget to install the Borland Database Engine too! It enables a lot of the effects of MicroDEM.
2.) Unzip the SPCAMO Color Files into the folder where you installed MicroDEM.
3.) Unzip WW2Map into a folder on your hard drive.
4.) Copy all the SHP files from your WinWW2\Game Data\Graphics or WinMBT\Game Data\Graphics folder to the folder where you unzipped WW2Map. 50 MB of space will be wasted this way, but hard drive space is cheap now; and it will save you plenty of time.
5.) Unzip the Blank SPCAMO map into the folder where you installed WW2Map.
Making Your First Map
First, we must answer the most important question of all: “What do we want to make a map of?”
How about Sedan, France? It's a nice World War 2 Map for the 1940 French Campaign.
Looking at Google Earth; we find out that the Latitude and Longitude for Sedan is: 49N; 4E. Write down this simple version; plus the full length version: 49.40.00.73N; 4.57.02.51E.
Now that we have a location; we need to download the Digital Elevation Models (or DEMs) that MicroDEM will use to generate our maps for us.
Luckily, NASA flew the Shuttle Radar Topography Mission in 2000 to generate the most detailed map of Earth yet to date. Even more luckily, NASA has made virtually all of the data from that mission freely available to the public.
You can download the SRTM data from NASA's FTP server here:
ftp://e0srp01u.ecs.nasa.gov/srtm/version2/
Going there; you will see several folders.
The SRTM1 folder is where the 30 meter resolution DEMs are held. Sadly, only DEMs of the Continental United States at this resolution are available due to national security restrictions; but they can be useful if you ever wanted to fight the Battle of Gettysburg again in Steel Panthers.
The SRTM3 folder is where the 90 meter resolution DEMs are held, and fortunately for us; cover virtually the entire world.
Since our map area is in France; we click the SRTM3 folder. We find ourselves with more subfolders dividing the world up. Hopefully the names for them should be self explanatory. Since our target is within Europe, we click on the Eurasia folder.
You will see a list of numbers which seem to make no sense. But they do make sense. Remember our earlier notation of where Sedan was? (49N; 4E)? Page down several dozen times until you get into the N49Exxx.hgt.zip area of the list.
You'll find what you're looking for in the N49E005.hgt.zipfile (1.1~ MB). Download it. To make things easier, download it to your MicroDEM folder.
Now, the map making fun begins! Go and load up MicroDEM.
When it's loaded up, click on this button in the toolbar
It loads DEMs. Select N49E005.hgt.zip.
You'll see something like this:
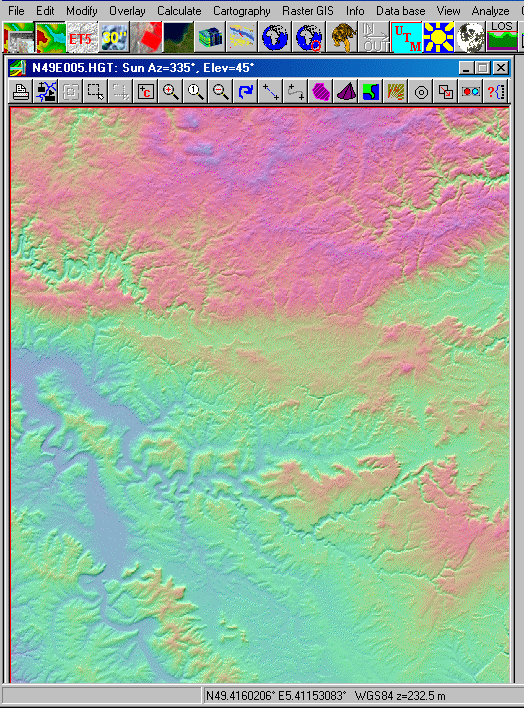
The little numbers at the bottom are latitude and longitude numbers. You can find general location of SEDAN (49.40.00.73N; 4.57.02.51E.) by looking at these numbers as you move the mouse cursor across the DEM.
Once you've found the general location of Sedan; it's time to
Subset the map. Click on the
 icon in the map window.
This enables the subset mode. Go to the northwest corner of your subset map; and click and hold the left mouse button. As you hold the LMB, drag your subset box to the southeast of what you want to subset. It should look like this:
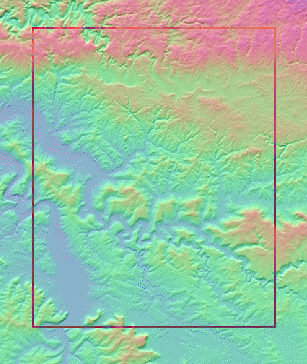
When you have what looks like a good area; let go of the LMB. MicroDEM will subset and zoom that area. If you like the area; don't forget to save it like so:
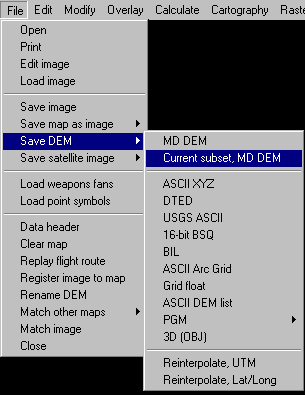
Save it as something like Sedan.DEM so that you can easily find your original subset later. (Click Here to download my Sedan Subset DEM)
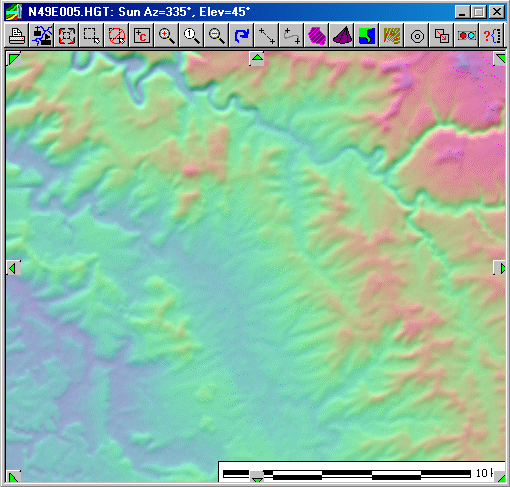
So we have something looking like this now:
Now we need to prepare this DEM for importation into WW2Map. Move your cursor all over the map, paying close attention to this:
![]()
It shows the height in meters for that particular set of the DEM. Move the cursor around around until you have a general idea of the minimum and maximum heights on the DEM. Once you do; right click on anywhere in the DEM. It will bring up this menu:
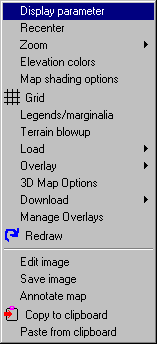
Select Display Parameter. The menu will then be replaced by a second menu:
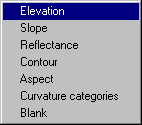
Select Elevation.
It will bring up a Dialog Box like this:

Select Colors from Table
Select the “Elevation Table” Button.
Select whichever one of the SPCAMO elevation tables fits your map (remember, this is why I asked you to figure out the general min/max heights of the map).
SPCAMO_COLORS_0-180.dbf (for maps of 0 to 180 meters in
height)
SPCAMO_COLORS_130-290.dbf (for maps of 130 to 290 meters
in height)
SPCAMO_COLORS_180-340.dbf (for maps of 180 to 340
meters in height)
I'll undoubtedly create more elevation tables as the need strikes me.
For this Sedan Map, SPCAMO_COLORS_180-340.dbf is a good match. So I select it.
Now, we need to figure out the pixel scale of this DEM.
![]()
Hit the “Info” in the toolbar. You should get the above window. Note “Screen pixel size = 22.63m”
To find the proper scale to be used in WW2Map; do the following equation below:
50 meters (SPCAMO hexes) / Screen Pixel Size = Pixels per Hex
So this means that the scale of the map is: 50/22.63=2.20. Rounding down, that gives us two pixels = one hex.
Now we need to prepare it for WW2Map's importer..
This part of the procedure is is where having a decent graphics editing program, such as Photoshop, or my personal preference; Paint Shop Pro, is a great advantage.
Simply hit print screen and paste your map into Photoshop or PSP.
Since 2 pixels = 1 hex; and the biggest map you can make with SPCAMO games is 160 hexes wide by 200 hexes high; your maximum image size is going to be 320x400 pixels. So fool around with the map, finding the ideal area that you like that's 320x400. Save that map area as a bitmap, with a descriptive name like SedanPrepped.BMP (you may download an example here).
(PS: Since the minimum hex conversion scale in WW2Map is 2 pixels/hex if your map is 1 pixel/hex, you will have to resize it by 200%)
Using WW2Map
Load up WW2Map.
Set it up by doing the following:
Files/Load Map
Select BlankMap.dat.
You'll see a blue screen. This isn't what we expected. To fix it, do:
Files/Set SHP Directory
Just click on the OPEN dialog button. See, this is why I suggested you put your SHPs into the WW2Map Directory; it makes your life easier.
Click one of the map scroll buttons; and you'll see the blue be replaced with the familiar grass graphics of SPCAMO games.
It's all set up now.
To import your bitmap, hit: Tools/Import from Bitmap, which will bring up this window.

Set it up by moving the Conversion Scale (x,y) from 5 x 5 Pixels/Hex to 2 x 2 Pixels/Hex.
Hit Load BMP and select Sedan.bmp
Hit the Alt 0-16 button.
Close the import bitmap window.
Move the screen up and down a bit. You should see it change to match your map.
If it meets with your approval; do Files/Save Map. Save it as something like spmap300.dat; something far enough down the list to not overwrite existing game maps; but not so far that you have to scroll down to the end.
Close WW2Map.
Setting it up in SPCAMO Games.
You still need to do some work here.
Once the map is loaded in the SPCAMO Map/Scenario editor; click anywhere; you'll see hexes change their images and look generally weird. Like below:
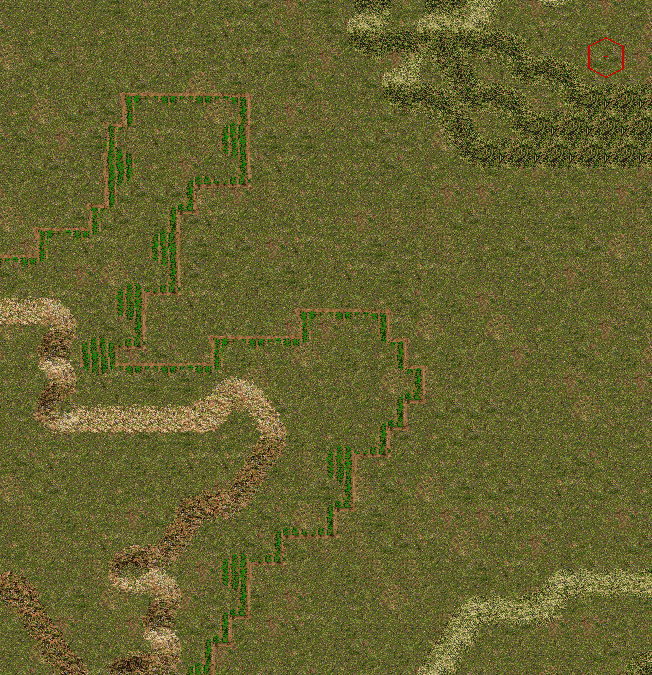
To fix this and various other errors; select Add Clear Terrain to the hex following the contours of the existing map. Apply it a couple times to some hill areas.
Looks sort of bad doesn't it? Don't worry.
Now select Fill Range and set it to 255, then use the Fill button a couple times (probably 4-5 times).
Congratulations. You now have your nicely contoured map near Sedan.
Now you just need to fill in the roads, trees, etc.